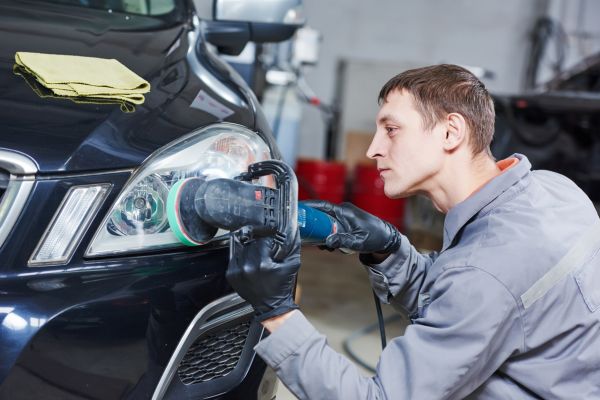
Cloudy headlights have a way of making a perfectly decent car look tired before its time. One day the front lenses are clear and sharp, and then, slowly, they begin to turn yellow, hazy, or dull. At first it seems cosmetic. The car still runs fine, the lights still switch on, and nothing feels urgent. But once you drive at night on a quiet road, especially in rain or fog, the difference becomes obvious. Dim headlights do not just affect appearance. They affect how far you can see, how quickly others notice you, and how confident you feel behind the wheel.
This headlight restoration guide explains why headlights fade, how restoration works, and what you can realistically do at home to bring back clarity. It is not a complicated job, but it does need patience. The goal is not simply to make the plastic shine for a day. The real aim is to remove the damaged surface layer and protect the lens so the results last.
Why Headlights Become Cloudy
Most modern headlight lenses are made from polycarbonate plastic. It is strong, lightweight, and far less likely to shatter than glass. That is why car manufacturers use it so widely. The downside is that plastic reacts badly to sunlight, road grime, heat, and chemicals over time.
When headlights are new, they usually have a protective coating on the outside. This coating helps block ultraviolet rays and keeps the plastic clear. After years of exposure, that coating starts to break down. Once it weakens, the plastic underneath begins to oxidize. That is the chalky, yellowish haze you see on older headlights.
Weather also plays a role. Dust, sand, road salt, car wash chemicals, and tiny bits of debris gradually wear away the lens surface. If the car sits outside most of the time, the process happens faster. A vehicle parked in strong sun every day will usually show cloudy headlights sooner than one kept in a garage.
How Cloudy Headlights Affect Night Driving
It is easy to underestimate how much light a hazy lens can block. The bulb may still be working, but the beam has to pass through a damaged plastic cover. Instead of projecting cleanly onto the road, the light scatters. That scattered light can look weak, uneven, or blurry from the driver’s seat.
This matters most on dark roads, during heavy rain, or in places with poor street lighting. Clear headlights help define lane markings, road edges, pedestrians, animals, and parked vehicles earlier. When your headlights are dull, you often notice hazards later than you should. That extra second or two can matter.
There is also the visibility others have of your car. Clear headlights make your vehicle easier to spot from a distance. So while restoration can improve the look of the car, the more important benefit is practical safety.
Checking Whether Restoration Is Worth Doing
Before starting, take a close look at the headlights in daylight. If the cloudiness is on the outside surface, restoration usually helps a lot. Run your fingers lightly over the lens. If it feels rough, chalky, or uneven, the outer layer is probably oxidized.
If the lens looks foggy from the inside, has moisture trapped inside, or shows deep cracks, restoration may only improve part of the problem. Internal condensation usually means the headlight housing seal is failing. In that case, polishing the outside will not fully solve the issue. Small surface scratches, yellowing, and dullness are ideal candidates for restoration. Deep damage or broken housings may need repair or replacement.
Preparing the Headlight Surface
Good preparation makes the whole job easier. Start by washing the headlight and the surrounding area with car shampoo or mild soap. Dirt left on the surface can scratch the plastic while you work. After washing, dry the lens completely with a clean microfiber cloth.
Masking is important. Use painter’s tape around the headlight edges to protect the paint, trim, and rubber seals. Sanding or polishing too close to painted panels without tape can leave marks, especially if you are using a drill attachment. Take your time here. A few extra minutes of careful taping can save irritation later.
It also helps to work in the shade. Direct sunlight can dry products too quickly and make the surface harder to control. A cool lens is easier to sand, polish, and seal.
Sanding Away the Damaged Layer
The heart of any proper headlight restoration guide is surface correction. Cloudy headlights are not fixed by wiping something over the top. The damaged outer layer has to be gently removed.
Wet sanding is the usual method. The word “sanding” can sound aggressive, but when done carefully with fine-grit sandpaper and water, it is controlled and safe. Start with a grit that matches the condition of the lens. Heavily yellowed headlights may need a lower grit first, while mildly cloudy headlights can begin with a finer grit.
Keep the surface wet while sanding. Water helps carry away residue and reduces heat. Sand in steady, even motions, covering the whole lens instead of focusing too long on one spot. At this stage, the headlight may look worse before it looks better. That is normal. The lens can turn evenly dull or frosted because you are leveling the surface.
After the first pass, move to finer grits. Each finer stage removes the sanding marks from the previous one. The surface should gradually become smoother and more uniform. Rushing this part often leads to uneven clarity later, so patience matters.
Polishing the Lens Back to Clarity
Once sanding is finished, polishing brings back transparency. A plastic polish or headlight polishing compound works best. Apply a small amount to a microfiber applicator, foam pad, or polishing pad. Work it into the lens using moderate pressure and overlapping motions.
If polishing by hand, expect it to take a bit of effort. The results can still be good, but it may require several passes. A drill with a foam pad can speed up the process, though it should be used carefully. Too much pressure or too much speed can heat the plastic.
As the polish breaks down, the lens should begin to clear. Wipe away residue with a clean microfiber cloth and inspect the surface from different angles. If some areas still look hazy, polish again. The goal is an even, clear finish across the entire headlight.
Protecting the Restored Headlights
This is the part many people skip, and it is the reason some restorations fail quickly. Once the damaged coating has been sanded away, the plastic needs new protection. Without a sealant, UV rays can start oxidizing the lens again in a short time.
A UV-resistant headlight sealant, clear coat, or protective wipe can help preserve the finish. The product should be applied to a clean, dry lens according to its instructions. Some coatings need curing time, so avoid rain, washing, or touching the surface until it has properly set.
Protection is what separates a quick shine from a real restoration. The lens may look beautiful after polishing, but the sealant helps keep it that way.
Common Mistakes That Ruin the Finish
One common mistake is using harsh household products and expecting lasting results. Toothpaste, baking soda, or vinegar can sometimes make headlights look slightly better for a short time, but they rarely provide a durable restoration. They may clean light surface grime, yet they do not replace proper sanding, polishing, and UV protection.
Another mistake is sanding unevenly. If one area gets more attention than the rest, the final beam and appearance may look patchy. Skipping grit stages can also leave visible scratches under the polished surface.
The biggest mistake, though, is forgetting the protective coating. A freshly polished plastic lens without UV protection is exposed. It may turn cloudy again faster than expected, especially in strong sunlight.
How Often Headlights Need Restoration
There is no exact schedule because conditions vary. A car parked outside in hot weather may need attention sooner than one kept under cover. In general, once headlights begin to look yellow or the beam seems weaker at night, it is worth checking them.
After restoration, regular washing helps remove road film before it builds up. Applying a suitable plastic protectant now and then can also extend clarity. It is much easier to maintain a restored headlight than to rescue one that has been badly neglected for years.
When Replacement Makes More Sense
Restoration is useful, but it has limits. If the lens is deeply cracked, badly pitted, leaking water, or damaged from the inside, replacement may be the better option. The same is true if the reflector inside the housing is failing. A clear outer lens cannot fix a weak internal reflector or poor electrical connection.
Still, many cloudy headlights are perfectly restorable. For a car that looks aged mainly because of yellow lenses, the improvement can be surprisingly satisfying. The front end looks cleaner, and night driving feels noticeably better.
Clear Headlights Make an Older Car Feel Sharper
Headlight restoration is one of those small jobs that makes a car feel cared for again. It does not require advanced mechanical skill, but it does reward careful work. Clean the surface, remove the oxidation, polish the plastic, and protect it properly. Each stage matters.
A good Headlight restoration guide is really about seeing the road clearly and giving an older vehicle back some of its original sharpness. Cloudy lenses creep up slowly, so the improvement can feel dramatic once they are restored. The car looks brighter, the road opens up better at night, and the whole front end feels fresher. Sometimes clear vision begins with something as simple as bringing the headlights back to life.